Replacement Seat Handle Compatible with Peloton…
Thank you for your purchase.
I am a new small business owner based in Los Angeles, and breaking into aftermarket support for exercise equipment, office furniture, electronics and more; finding solutions for problems I have personally experienced and passing my knowledge, fixes, and support to my customers. Your purchase is important to me as it allows me to explore cost effective solutions to everyday problems, supply superior equipment for product weak-points, and make them readily available on Amazon for purchase. I am a one man band and handle absolutely everything myself from product development, sourcing & supply chain, photography, graphic design, web design, marketing, fulfillment, customer service, and post sales support – If you have any questions, suggestions , issues with products not working correctly or need help, please feel free to reach out below and I will try and respond within 1 business day:
CONTACT: support@dingledongle.io
This page is specifically here to help you with the installation process of repairing your bike
INSTRUCTIONS
Removing the old L handle
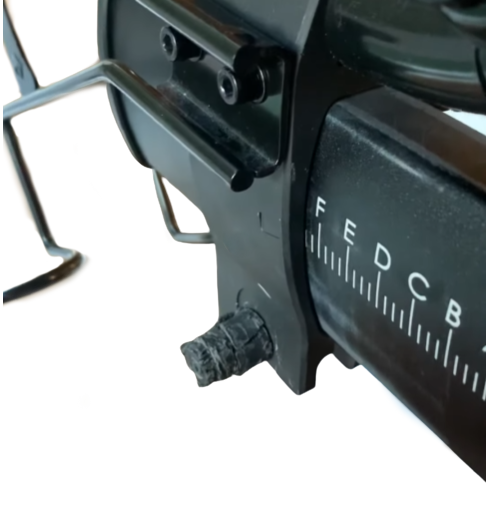
your broken piece may look something like this picture below for the horizontal handle. If you broke the vertical adjustment handle, it is the same process for removal. Lets hope it’s a simple removal where you can just back it out, otherwise the instructions below will help you remove it.

If you are able to, grip the sheared off piece with vice grips and rotate counter clockwise to remove the broken L handle. If it keeps spinning, you are going to need to break the plastic part to reveal the metal head underneath that is easier to grip by cutting the plastic housing.
If needed, use a small hacksaw with fine teeth suitable for metal/bi-metal. Create a vertical cut approximately half an inch behind where the lever was previously placed until the blade hits the metal inside the bolt (you are cutting through the plastic remainder of what is left). Rotate the saw and repeat this process until a complete 360-degree cut has been made.
Create a horizontal cross-sectional cut (the idea is to totally remove all the plastic on the broken handle and expose the metal, trust me the old handle is going in the garbage, its OK if its not perfectly clean, the goal is to give yourself a nice grip on the metal of what is left) and use pliers to remove pieces until the bolt is exposed. Use pliers to rotate and remove the bolt by gripping the newly exposed metal piece under the plastic. It may require more turning than expected and may resist at the end. To prevent it from falling, consider removing the seat entirely. Ensure you take your time installing the new replacement bolts straight. There should not be any resistance until 13 rotations of either bolt.
Video below for a visual aid – this method words for both the vertical seat handles, and horizontal ones.
Before you bolt!
If you found this product and installation instructions helpful, I would GREATLY appreciate you leaving a review on Amazon as typically less than 1% leave feedback even if they have a positive experience. Your support in this regard helps other customers understand the value in Dingle Dongle, and the loyalty I have to my customers. With that said, I offer a LIFETIME WARRANTY for all of the products I sell as I strive for only THE BEST. If you need help or support, have questions or concerns, please reach out to: support@dingledongle.io and I will make sure you are taken care of.
Need more parts?
Replacement Horizontal Seat Handle Compatible with Peloton
Horizontal Seat Adjustment Square Nut Compatible with Peloton
Replacement Seat Post Handle/Handlebar Height Lever Compatible with Peloton
Replacement Drive Belt Compatible with Peloton Bike and Bike +