Herman Miller Replacement Bolt Installation
Thank you for your purchase.
I am a new small business owner based in Los Angeles, and breaking into aftermarket support for exercise equipment, office furniture, electronics and more; finding solutions for problems I have personally experienced and passing my knowledge, fixes, and support to my customers. Your purchase is important to me as it allows me to explore cost effective solutions to everyday problems, supply superior equipment for product weak-points, and make them readily available on Amazon for purchase. I am a one man band and handle absolutely everything myself – If you have any questions, suggestions, issues with products or need help, please feel free to reach out below:
CONTACT: support@dingledongle.io
This page is specifically here to help you with the installation process of repairing your chair
INSTRUCTIONS
- Remove the old bolt from the armrest. It may be loose enough to hand turn out. If not a pair of plyers or grips will make it easier to back out. Don’t worry about the other internal parts in the armrest if they move around or fall out, just keep them near by and I will illustrate how they go back together.

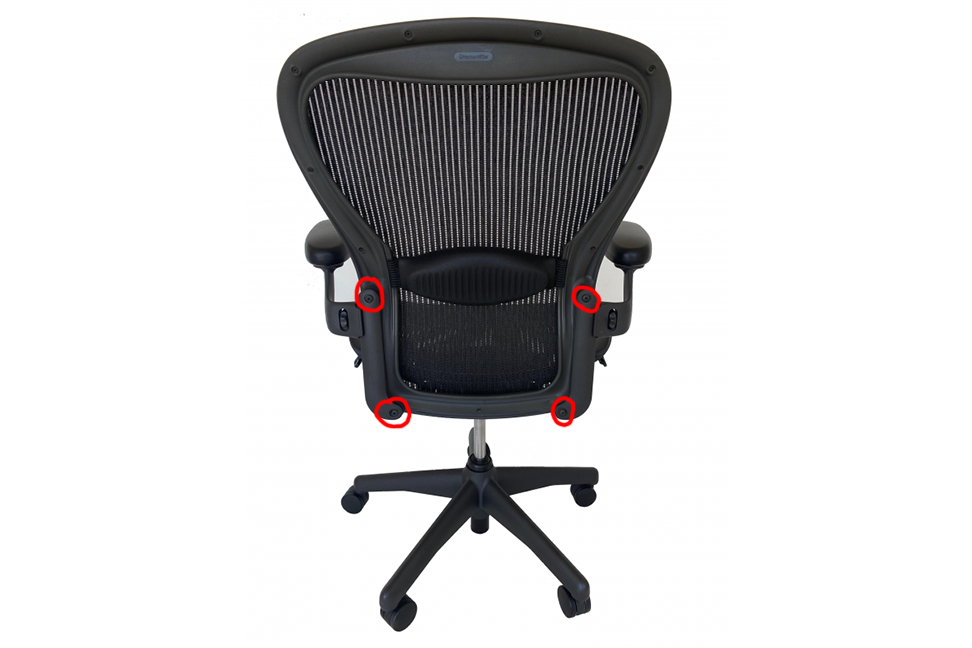
2. Remove the 4 bolts in picture below circled in red on the backrest of the chair with a 5mm hex key. Lift the chair back vertically to get it out and put it aside

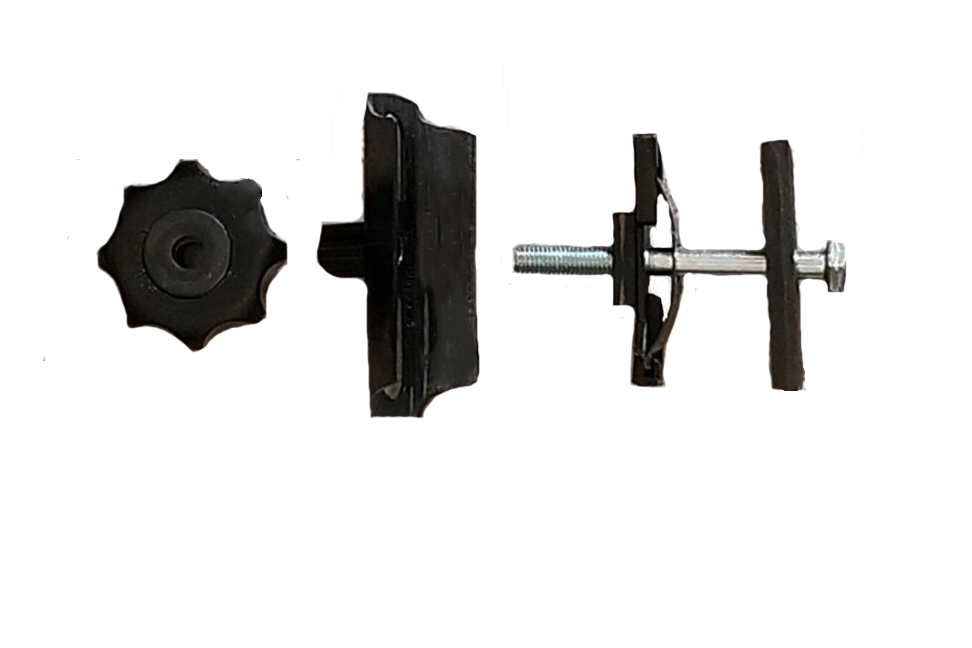
3. First insert the new bolt into the rectangular plastic piece, then spring like flange like in the picture below. Keep in mind the new bolt, and spring flange and plastic rectangular spacer are together on the inner most part of the frame. You feed this through the metal vertical chair frame then larger metal bracket goes on the outside (bridges gap between frame of chair and arm piece) then the bolt goes into the arm assembly, through the wheel and finally into the plastic nut that should be on the very outside of the arm assembly (inside the arm), connecting everything. It is a little tricky to get it all to line up, but once you get it started its easy to finish it. There are bearings that may fall out when you disassemble these are part of the wheel, and if installed correctly, you should only see the flat color metal washer looking side, not the ball bearings (ball bearings face the inside of the wheel to allow it to rotate easier)

4. Gently tighten the bolt down using plyers or grips so it’s just snug to less than 2ft/lbs of torque. It does not take much, and absolutely do not overtighten as you risk breaking the assembly and / or the bolt . Adjust the wheel positional rotation to identify if you need to continue turning the bolt, or if it will suspend the arm appropriately once installed, but do not over tighten as you risk damage. You may need to hold the wheel as you tighten the bolt down. Now is the time to make adjustments to bolt / wheel rotation and tightness and check to see if its enough to lock the arm, but loose enough to adjust arm height using the wheel. You will find the sweet spot by loosening the wheel, and tightening the bolt, or tightening the bolt and loosening the wheel. You can not make these adjustments once you install the back of the chair, so now is the time to check!
5. To replace the second side with the OEM bolt intact, simply back out the weak hex with a T27, and insert the replacement bolt.
Enjoy your indestructible arm bolts that can endure a fall from the 8th floor of your office building.
Before you bolt!
If you found this product and installation instructions helpful, I would GREATLY appreciate you leaving a review on Amazon as typically less than 1% leave feedback even if a positive experience. It will help tremendously & support future projects and fixes for Herman Miller and other products.
Thanks again!
Dingle Dongle
9 Comments
Stacey · April 17, 2023 at 4:49 pm
Thank you so much – these replacement bolts worked perfectly & instructions are great.
Jay Rafuse · August 12, 2023 at 7:08 pm
Unbelievably easy! Was able to replace both bolts and Re-assemble in less than 20 minutes! Highly recommend!
admin · August 16, 2023 at 7:33 pm
Hey Jay. Thanks for the kind words! If you can if you haven’t already, if you could leave a review on Amazon I’d GREATLY appreciate it! Will only help others in the same situation as us all. Thanks!
Scot · January 14, 2024 at 5:16 pm
So glad I found your product! I was worried I might require a more expensive solution. These bolts and your instructions work well. Thanks!
Rick R · November 17, 2023 at 2:46 pm
Thank you so much for the clear and easy to understand instructions. The bolt fits perfectly and my armrest is fully operational.
admin · November 17, 2023 at 7:04 pm
Thanks for your note Rick – I am glad they worked out for you! If you ever have any issues with them (you shouldn’t unless the chair falls off the roof of an office building), I am always here!
Phiilip Quatrini · November 26, 2023 at 5:31 pm
I have additional parts that aren’t shown in your instructions. A coil spring and small clip.
admin · November 26, 2023 at 11:29 pm
Hey Phillip – Just to confirm you have the wheel lock version of the chair, and not the newer lever lock version that just flips up to adjust, and down to lock?
The internals across all wheel locks should be the same and to my knowledge not contain any coiled springs. Can you shoot me a picture so I can take a look and try and understand
support@dingledongle.io
Thanks!
admin · November 18, 2024 at 8:26 am